Rocket Class Usage#
Defining a Rocket in RocketPy is simple and requires a few steps:
Define the rocket itself by passing in the rocket’s dry mass, inertia, drag coefficient and radius;
Add a motor;
Add, if desired, aerodynamic surfaces;
Add, if desired, parachutes;
Set, if desired, rail guides;
See results.
Lets go through each of these steps in detail.
1. Defining the Rocket#
The first step is to define the rocket itself. This is done by creating a Rocket object and passing in the rocket’s dry mass, inertia, drag coefficient and radius:
from rocketpy import Rocket

calisto = Rocket(
    radius=127 / 2000,
    mass=14.426,
    inertia=(6.321, 6.321, 0.034),
    power_off_drag="../data/calisto/powerOffDragCurve.csv",
    power_on_drag="../data/calisto/powerOnDragCurve.csv",
    center_of_mass_without_motor=0,
    coordinate_system_orientation="tail_to_nose",
)
Caution
Pay special attention to the following:
massis the rocket’s mass, without the motor, in kg.inertiais defined as a tuple of the form(I11, I22, I33). WhereI11andI22are the inertia of the mass around the perpendicular axes to the rocket, andI33is the inertia around the rocket center axis.Alternatively,
inertiacan be defined as a tuple of the form(I11, I22, I33, I12, I13, I23). WhereI12,I13andI23are the component of the inertia tensor in the directions12,13and23respectively.center_of_mass_without_motorandcoordinate_system_orientationare position parameters. They must be treated with care. See the Positions and Coordinate Systems section for more information.
See also
For more information on the rocketpy.Rocket class initialization, see
rocketpy.Rocket.__init__ section.
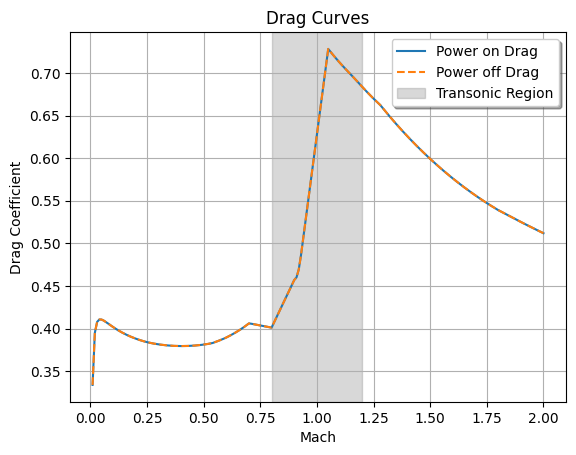
Drag Curves#
The Rocket class requires two drag curves, one for when the motor is off
and one for when the motor is on. When the motor is on, due to the exhaust
gases, the drag coefficient is lower than when the motor is off.
Note
If you do not have a drag curve for when the motor is on, you can use the same drag curve for both cases.
These curves are used to calculate the drag coefficient of the rocket at any given time.
The drag curves can be defined in two ways:
Passing in the path to the drag curve CSV file as a string;
Passing in a function that returns the drag coefficient given the Mach number.
Curves defined in CSV files must have the first column as the Mach number and the second column as the drag coefficient. Here is an example of a drag curve file:
0.0, 0.0
0.1, 0.4018816
0.2, 0.38821269
0.3, 0.38150576
0.4, 0.37946785
0.5, 0.38118499
0.6, 0.38947261
0.7, 0.40604949
0.8, 0.40110651
0.9, 0.45696342
1.0, 0.62744566
Tip
Getting a drag curve can be a challenging task. To get really accurate drag curves, you can use CFD software or wind tunnel data.
However, if you do not have access to these, you can always use RASAero II software. In there you need only define the geometry of the rocket and access AeroPlots.
2. Adding a Motor#
The second step is to add a motor to the rocket. This is done by creating a Motor object.
With the motor defined, you can add it to the rocket:
calisto.add_motor(example_motor, position=-1.255)
Caution
Again, pay special attention to the position parameter. See
the Positions and Coordinate Systems section for
more information.
3. Adding Aerodynamic Surfaces#
The third step is to add aerodynamic surfaces (i.e. nose cone, fins and tail) to the rocket. These surfaces are used to calculate the rocket’s aerodynamic forces and moments.
Differently from the motor, the aerodynamic surfaces do not need to be defined before being added to the rocket. They can be defined and added to the rocket in one step:
nose_cone = calisto.add_nose(
    length=0.55829, kind="von karman", position=1.278
)

fin_set = calisto.add_trapezoidal_fins(
    n=4,
    root_chord=0.120,
    tip_chord=0.060,
    span=0.110,
    position=-1.04956,
    cant_angle=0.5,
    airfoil=("../data/calisto/NACA0012-radians.csv","radians"),
)

tail = calisto.add_tail(
    top_radius=0.0635, bottom_radius=0.0435, length=0.060, position=-1.194656
)
Caution
Again, pay special attention to the position parameter. See
the Adding Aerodynamic Surfaces section for
more information.
See also
For more information on adding aerodynamic surfaces, see:
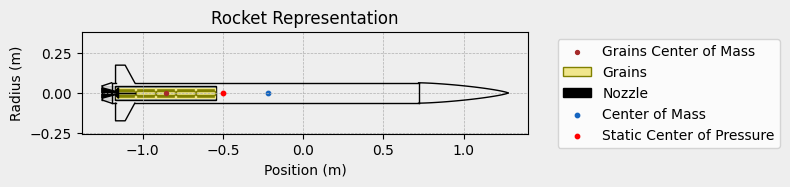
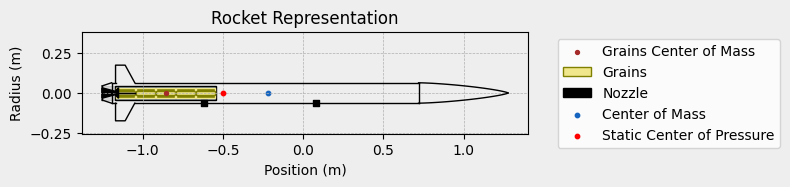
Now we can see a representation of the rocket, this will guarantee that the rocket has been constructed correctly:
calisto.draw()
Adding Airfoil Profile to Fins#
The Rocket.add_trapezoidal_fins and Rocket.add_elliptical_fins methods
have an optional parameter called airfoil. This parameter allows you to
specify an airfoil profile for the fins.
The airfoil parameter can be None, in which case fins will be treated as
flat plates. Otherwise, it can be a tuple of the form (path, units).
The path is the path to the airfoil CSV file in which the first column is
the angle of attack and the second column is the lift coefficient.
The units is the unit of the first column of the CSV file.
It can be either "radians" or "degrees".
An example of a valid CSV file for a NACA0012 airfoil is:
0.0,          0.0
0.017453293,  0.11
0.034906585,  0.22
0.052359878,  0.33
0.06981317,   0.44
0.087266463,  0.55
0.104719755,  0.66
0.122173048,  0.746
0.13962634,   0.8274
0.157079633,  0.8527
0.174532925,  0.1325
0.191986218,  0.1095
0.20943951,   0.1533
Note
This CSV file has the angle of attack in radians. It is important that the CSV file has angle of attack points until the stall point.
Tip
You can find airfoil CSV files in Airfoil Tools
4. Adding Parachutes#
The fourth step is to add parachutes to the rocket. For that, we need:
The parachute drag coefficient times reference area for parachute
cd_sThe parachute trigger
trigger. More details on Trigger Details.The parachute trigger system sampling rate
sampling_rate.
Optionally, we can also define:
The parachute trigger system lag
lag.The parachute trigger system noise
noise.
Lets add two parachutes to the rocket, one that will be deployed at apogee and another that will be deployed at 800 meters above ground level:
main = calisto.add_parachute(
    name="Main",
    cd_s=10.0,
    trigger=800,
    sampling_rate=105,
    lag=1.5,
    noise=(0, 8.3, 0.5),
)

drogue = calisto.add_parachute(
    name="Drogue",
    cd_s=1.0,
    trigger="apogee",
    sampling_rate=105,
    lag=1.5,
    noise=(0, 8.3, 0.5),
)
See also
For more information on adding parachutes, see
rocketpy.Rocket.add_parachute
Parachute Trigger Details#
The parachute trigger is a very important parameter. It is used to determine
when the parachute will be deployed. It can be either a number, a string
"apogee", or a callable.
If it is a number, it is the altitude at which the parachute will be deployed.
If it is a string "apogee", the parachute will be deployed at apogee.
If it is a callable, it must be a function that takes three parameters:
p: pressure considering parachute noise signal.h: height above ground level considering parachute noise signal.y: state vector in the from[x, y, z, vx, vy, vz, e0, e1, e2, e3, w1, w2, w3].
The function must return True if the parachute should be deployed and
False otherwise.
The p and h parameters are useful if you want to deploy the parachute
based on the pressure or height above ground level. The y parameter is
useful if you want to deploy the parachute based on the state vector (velocity,
attitude angle, etc).
This function is called throughout the simulation. Therefore, you can use it to deploy the parachute at any time.
The following example shows how to define a callable trigger function that will deploy the drogue parachute when the vertical velocity is negative (apogee) and will deploy the main parachute when the vertical velocity is negative (post-apogee) and the height above ground level is less than 800 meters:
def drogue_trigger(p, h, y):

    # activate drogue when vz < 0 m/s.
    return True if y[5] < 0 else False


def main_trigger(p, h, y):

    # activate main when vz < 0 m/s and z < 800 m
    return True if y[5] < 0 and h < 800 else False
Note
You can import c or cpp code into Python and use it as a callable
trigger function. This allows you to simulate the parachute trigger system
that will be used in the real rocket.
5. Setting Rail Guides#
In RocketPy, any rail guides are simulated as rail buttons. The rail buttons are defined by their positions.
Note
Rail buttons are optional for the simulation, but are very important to have realistic out of rail speeds and behavior.
Here is an example of how to set rail buttons:
rail_buttons = calisto.set_rail_buttons(
    upper_button_position=0.0818,
    lower_button_position=-0.618,
    angular_position=45,
)
Caution
Again, pay special attention to both positions parameter. See
the Setting Rail Guides section for more information.
See also
For more information on setting rail buttons, see
rocketpy.Rocket.set_rail_buttons
6. See Results#
Now that we have defined the rocket, we can plot and see a bit of information about our rocket, and double check if everything is correct.
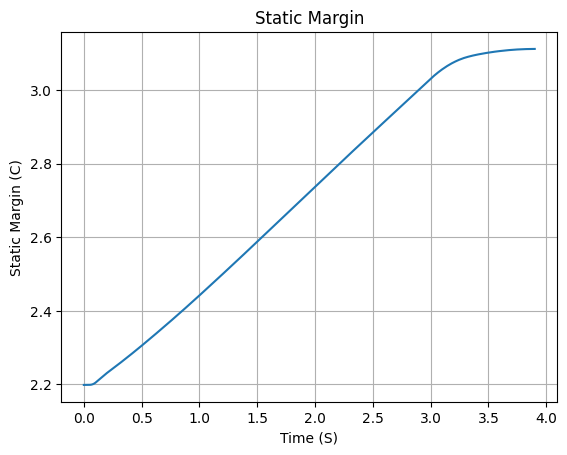
First, lets guarantee that the rocket is stable, by plotting the static margin:
calisto.plots.static_margin()

Danger
Always check the static margin of your rocket.
If it is negative, your rocket is unstable and the simulation will most likely fail.
If it is unreasonably high, your rocket is super stable and the simulation will most likely fail.
The lets check all the information available about the rocket:
calisto.all_info()
Inertia Details
Rocket Mass: 14.426 kg (without motor)
Rocket Dry Mass: 16.241 kg (with unloaded motor)
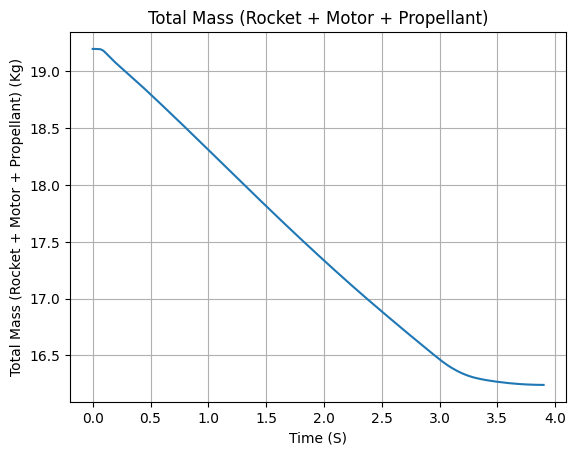
Rocket Loaded Mass: 19.197 kg (with loaded motor)
Rocket Inertia (with unloaded motor) 11: 7.864 kg*m2
Rocket Inertia (with unloaded motor) 22: 7.864 kg*m2
Rocket Inertia (with unloaded motor) 33: 0.036 kg*m2
Rocket Inertia (with unloaded motor) 12: 0.000 kg*m2
Rocket Inertia (with unloaded motor) 13: 0.000 kg*m2
Rocket Inertia (with unloaded motor) 23: 0.000 kg*m2
Geometrical Parameters
Rocket Maximum Radius: 0.0635 m
Rocket Frontal Area: 0.012668 m2
Rocket Distances
Rocket Center of Dry Mass - Center of Mass without Motor: 0.105 m
Rocket Center of Dry Mass - Nozzle Exit: 1.150 m
Rocket Center of Dry Mass - Center of Propellant Mass: 0.753 m
Rocket Center of Mass - Rocket Loaded Center of Mass: 0.116 m
Aerodynamics Lift Coefficient Derivatives
Nose Cone Lift Coefficient Derivative: 2.000/rad
Fins Lift Coefficient Derivative: 6.280/rad
Tail Lift Coefficient Derivative: -1.061/rad
Center of Pressure
Nose Cone Center of Pressure position: 0.999 m
Fins Center of Pressure position: -1.100 m
Tail Center of Pressure position: -1.223 m
Stability
Center of Mass position (time=0): -0.221 m
Center of Pressure position (time=0): -0.500 m
Initial Static Margin (mach=0, time=0): 2.199 c
Final Static Margin (mach=0, time=burn_out): 3.112 c
Rocket Center of Mass (time=0) - Center of Pressure (mach=0): 0.279 m
Parachute Details
Parachute Main with a cd_s of 10.0000 m2
Ejection signal trigger: 800 m (AGL)
Ejection system refresh rate: 105.000 Hz
Time between ejection signal is triggered and the parachute is fully opened: 1.5 s
Parachute Details
Parachute Drogue with a cd_s of 1.0000 m2
Ejection signal trigger: At Apogee
Ejection system refresh rate: 105.000 Hz
Time between ejection signal is triggered and the parachute is fully opened: 1.5 s
Rocket Draw
----------------------------------------
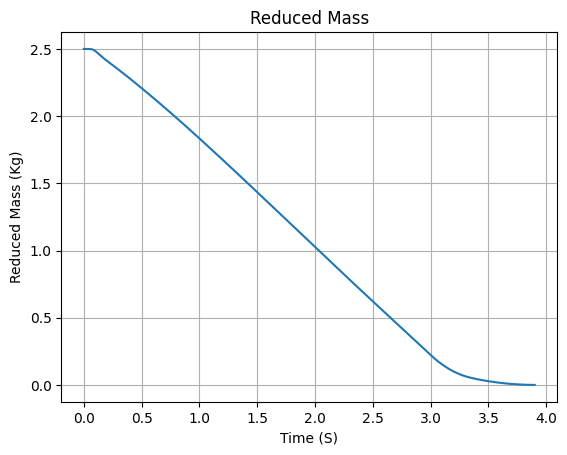
Mass Plots
----------------------------------------
Aerodynamics Plots
----------------------------------------
Drag Plots
--------------------
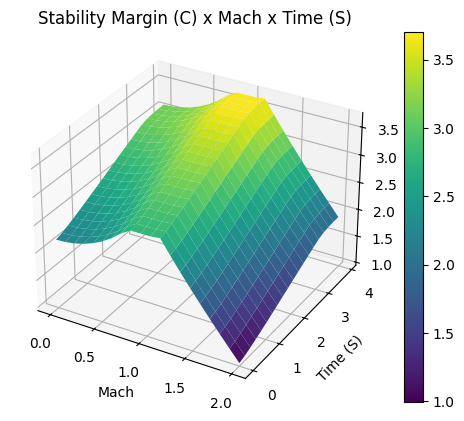
Stability Plots
--------------------
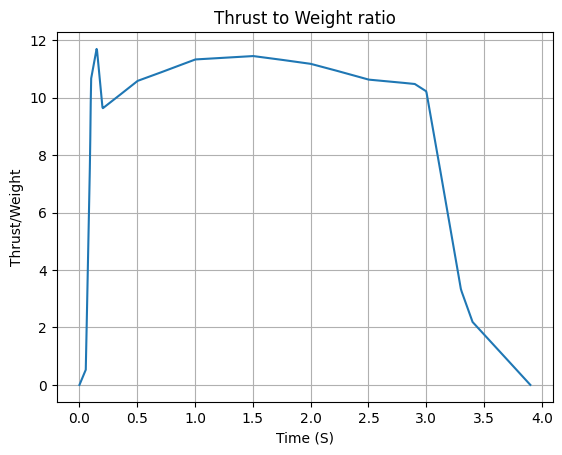
Thrust-to-Weight Plot
----------------------------------------